
The IOTA Data Marketplace: a Technical Introduction
Part 3: Publishing Sensor Data
https://data.iota.org
In the previous article in this series, we discussed sensor onboarding in detail. Today we will learn how to submit sensor data to Tangle using a simple script.
Let me re-introduce the screenshot from the previous article, so we can start from there.

Click the “Download Publish Script” link at the bottom of the sensor card. This will initiate the download of a preconfigured .zip archive.
Once you download and extract the content of the archive, please open an IDE of your choice to start working with the script. I suggest you use a simple yet powerful IDE like Atom or VS Code. You may also use a simple Text Editor if you prefer.
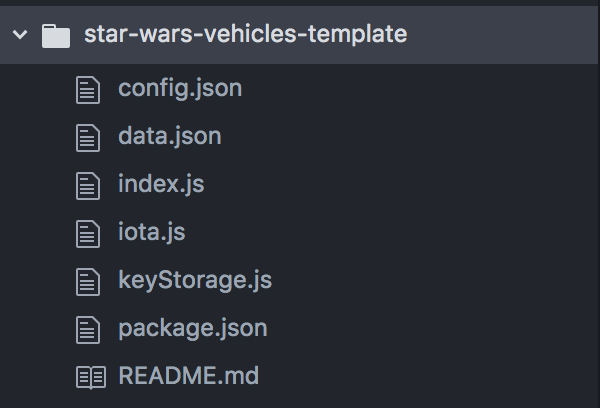
The archive (aka project) structure is fairly simple, and contains a number of .js and .json files, along with the project documentation (README.md).
Please always read the README.md before you start using the script.
Getting started
- Install Node.js (if not done already).
- Check Node.js version. Run “node -v” in your console or terminal.
We support Node.js version 8 and above. Please update if your Node.js version is older.
- Install a package manager (if not done already). I suggest Yarn or NPM.
- Carefully read the README.md file.
- Install packages by running
yarnornpm install, depending on your package manager.
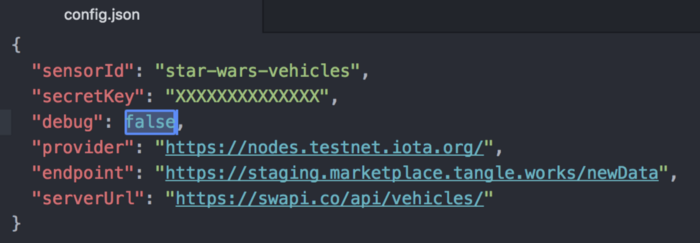
The script is pre-configured to publish data for the selected sensor. You’ll find the sensor ID and its secret key in the config.json file.
If you decide to use the same script for multiple sensors, please note that the secret key should be changed as well. Otherwise, you won’t be able to decrypt your published data.
By default, the script runs in debug mode, which means that no data is published. All captured data is printed out in the console, so you can verify and adjust it. Once the payload looks good, you can disable debug mode by setting the debug variable to false in the config.json file (see screenshot below), and let data be published.
Please note that the Proof-of-Work operation is conducted for every data package, which might take up to 60 seconds depending on your hardware. Please take this into account and do not interrupt the script while running this operation.
Processing Sensor Data
At this point, we’re not targeting any real sensor. In this tutorial, we will read data from a static file and by requesting an API endpoint, that should provide data.
A library that reads real sensor data will require much more technical know-how and also will be too specific to a selected sensor.
The index.js file comes with 2 examples:
- Example 1 demonstrates how to read sensor data from a static file or database. For this example, we provided a data.json file with sample data.
- Example 2 demonstrates how to run the script in an infinite loop to query data at specified time intervals. It reads data from a remote server and contains a condition to break the loop (i.e. stop execution) once a defined status code is received. For this example, we utilize a server that serves sample data. To modify the server URL, please update the serverUrl field from the config.json file in the same folder.
Let’s see how to use each of the provided examples:
Example 1 reads data from a JSON file. We assume that this file contains an array of data sets, where each data set has data relevant to the payload.
[
  {
    "name": "Imperial Speeder Bike",
    "model": "74-Z speeder bike",
    "manufacturer": "Aratech Repulsor Company",
    "vehicle_class": "speeder"
  },
  {
    "name": "Droid tri-fighter",
    "model": "tri-fighter",
    "manufacturer": "Phlac-Arphocc Automata Industries",
    "vehicle_class": "droid starfighter"
  }
]
Alternatively, you can implement functionality that reads data from a database of your choice.
Once you secured the source of data, process it in a loop and send the payload to the publish() function, which does all the necessary jobs for publishing your data in Tangle.
In the provided example we included a debug functionality, so you can safely verify your payload without publishing it to Tangle.
const { publish } = require('./iota');
const { debug } = require('./config.json');
const data = require('./data.json');

// EXAMPLE 1: read static data from file/database
data.forEach(payload => {
  if (debug) {
    console.log(payload);
  } else {
    // Publish sensor data to marketplace
    publish(payload); // your sensor data goes here. Payload is any content in JSON format
  }
});
If you know what you’re doing and absolutely sure that your payload is correct, your publish script could shrink to only 3 lines of code:
const { publish } = require('./iota');
const data = require('./data.json');

data.forEach(payload => publish(payload));
Example 2 requests data sets from a remote server in an infinite loop. For this example we utilize the Star Wars API which serves sample data. To modify the server URL and point it to your server, please update the serverUrl field from the config.json file in same folder.
const fetch = require('node-fetch');
const { publish } = require('./iota');
const { debug, serverUrl } = require('./config.json');

const queryData = async delay => {
  const getRandomInt = max => Math.floor(Math.random() * Math.floor(max));
  while (true) {
    // Access public server. URL is configurable in config.json
    // In this example a Star Wars API is used for demo purposes
    const response = await fetch(serverUrl + getRandomInt(73)); // construct URL to request a random star wars vehicle
    const status = response.status;
    const json = await response.json();

    // Continuously check the response status until it's completed, failed or times out.
    if (status === 418) { // specify your HTTP status codes here
      break;
    } else if (status === 200) {
      const { name, model, manufacturer, vehicle_class } = json;
      const payload = { name, model, manufacturer, vehicle_class };

      if (debug) {
        console.log(payload);
      } else {
        // Publish sensor data to marketplace
        await publish(payload); // your sensor data goes here. Payload is any content in JSON format
      }

      // Delay before running the next loop iteration:
      await new Promise(resolve => setTimeout(resolve, delay));
    }
  }
}

queryData(60000) // query data every 60 seconds
Since some calls to this API might result in an empty response, and total dataset currently contains only 73 entries, we additionally introduced logic that randomly requests one data set from the server. In other words, the function getRandomInt is only relevant for the example shown and not necessary for capturing your sensor data.
A simplified version of this script could look like the code below:
const fetch = require('node-fetch');
const { publish } = require('./iota');
const { serverUrl } = require('./config.json');

const queryData = async delay => {
  while (true) {
    const response = await fetch(serverUrl);
    const status = response.status;
    const json = await response.json();

    // Continuously check the response status until it's completed, failed or times out.
    if (status === 418) { // specify your HTTP status codes here
      break;
    } else if (status === 200) {
      const { param1, param2 } = json;

      // Publish sensor data to marketplace
      await publish({ param1, param2 }); // your sensor data goes here. Payload is any content in JSON format

      // Delay before running the next loop iteration:
      await new Promise(resolve => setTimeout(resolve, delay));
    }
  }
}

queryData(60000) // query data every 60 seconds
We covered a lot today, so please take your time to review the article, play with the script, and ask questions.
Part 1: IOTA Data Marketplace — Update
Part 3: Publishing Sensor Data
Part 4: Cloud Backend Configuration
Follow us on our official channels for the latest updates:
Discord | Twitter | LinkedIn | Instagram | YouTube