The IOTA Data Marketplace: a Technical Introduction
Part 2: Sensor Onboarding
This is the first in a series of technical-level posts, aimed at those who want to understand more about how Data Marketplace works under the hood. In this article, I introduce Sensor Onboarding, explain how to configure it properly, and the limitations of the current Proof of Concept application.
In order to quickly onboard your sensors, we have developed an application with a few code examples that you can go through to be fully set up. This blog post is aimed at developers, but it can also be followed by anyone without a technical background.
Your sensors and data
The Data Marketplace is agnostic to the sensors and the data that you connect to it. Any sensor that has the ability to transmit data and has an easy way to get regular data readings (e.g. through an API) can be used for the data marketplace. In order to submit the data to the marketplace, all you have to do is execute a script to submit data to the IOTA Tangle, which is the data structure behind IOTA.
Example sensors to utilize
● Nordic Semiconductor Thingy:52
● Or simply a Raspberry Pi’s, with a sensor kit
Data fields
For each of your sensors, you have to define the correct data fields which will then be stored on the Tangle, and displayed on the Data Marketplace website to the purchaser. In general, just be descriptive with the data you want to store and sell. At this stage, we won’t worry too much about what I mean by storing data on the Tangle, as I’ll get into that in another blog post.
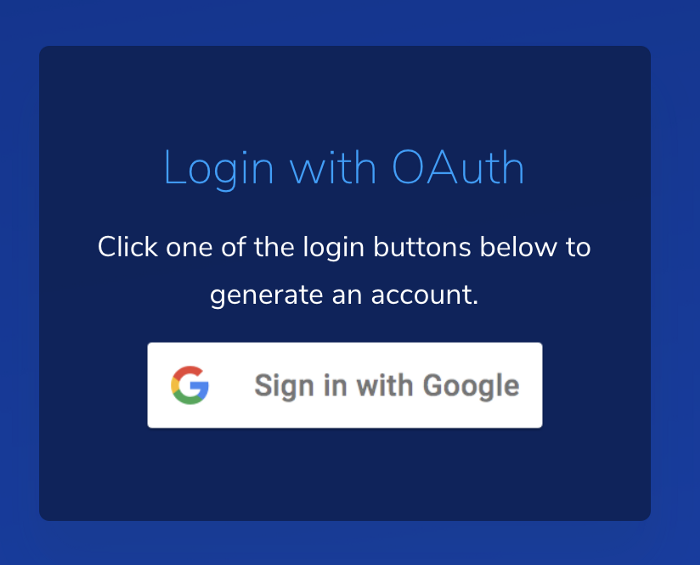
If you want to participate, proceed to the Dashboard page to log in. Here you will see a Google OAuth login screen. Click the “Sign in with Google” button and a prompt should appear.
Once logged in you will see an option to create a new device.
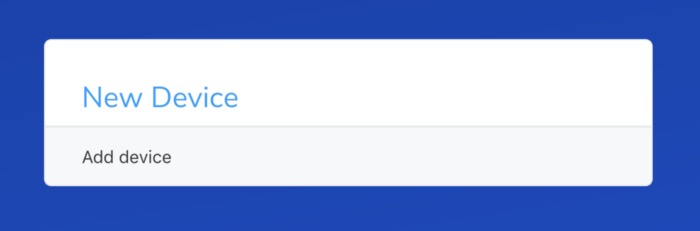
You can create up to 5 sensors per account with the default settings. This number can be adjusted upon request.
Enter some basic information about your sensor. Make sure you fill out the fields relating to the data streams you would like to collect.
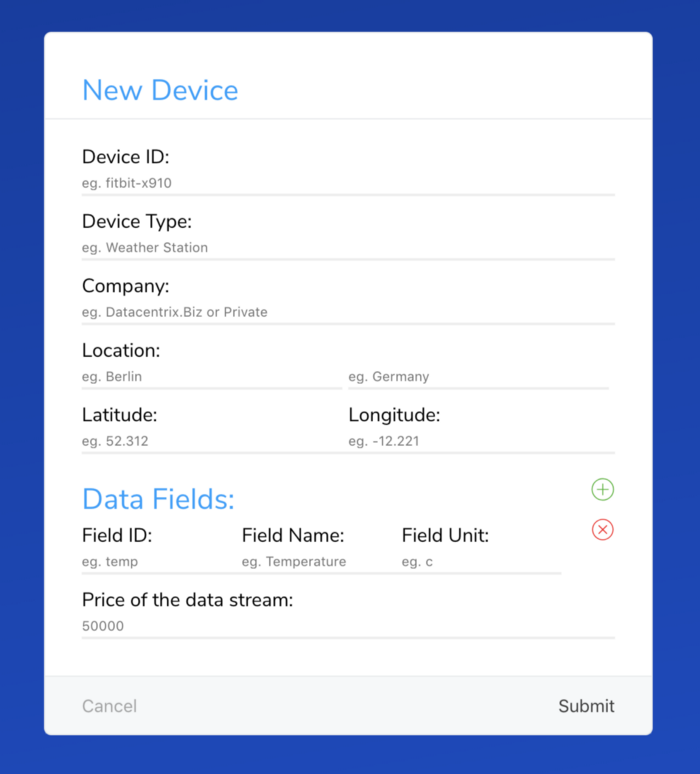
For each new sensor, we ask you to provide the following information:
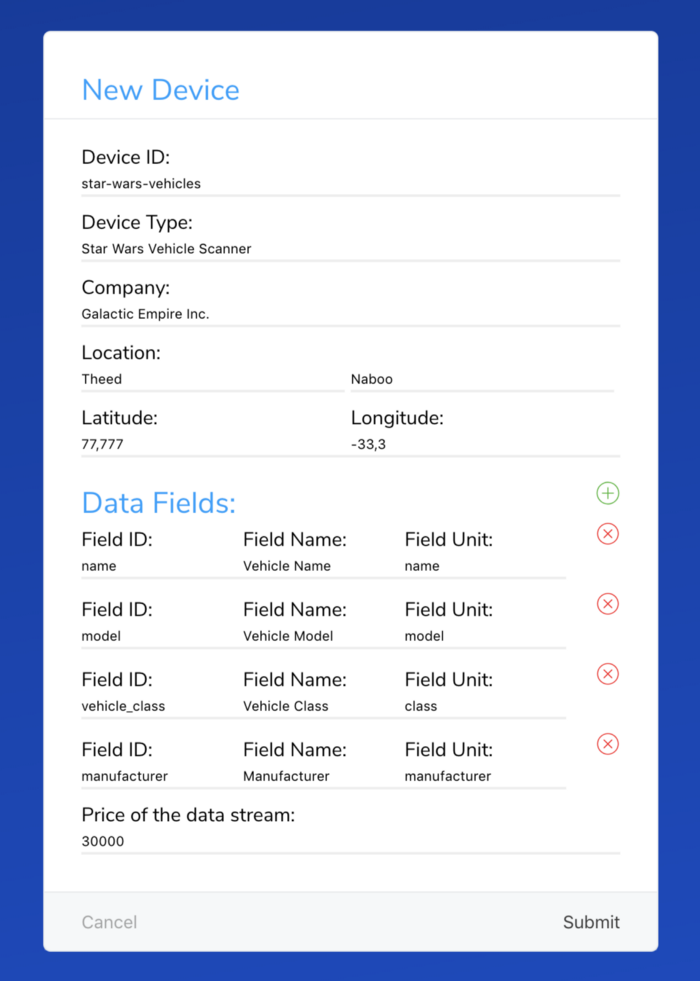
- Device ID: This ID should be unique among all existing sensors and will serve as an access key when purchasing a data stream. Please note that the ID must begin with a letter ([a-z]) and may be followed by any number of letters, digits ([0–9]), hyphens (“-”), and underscores (“_”). Max allowed length is set to 40 characters.
- Device Type: Plain text type description, that helps other Data Marketplace participants identify potential usage of the sensors’ data stream. Typical examples: “weather station”, “tracking device”, “charging station”.
- Company: Provide the name of the company that owns and maintains the sensor. This information creates more trust between sensor owners and Data Marketplace users who are interested in purchasing the data stream.
- Location (city/country): This information helps to identify if the sensor data is relevant for purchasing. For example, some users might be interested in purchasing data streams from weather or environmental sensors located in a specific region.
- GPS Coordinates (latitude/longitude): You can use a service like https://www.gps-coordinates.net/ to get the right GPS data for your sensor. We accept coordinates as a number of digits ([0–9]), that could be prepended by a hyphen (“-”) for negative value, and a decimal separator (“.”). Please do not enter any letters or special characters.
- Price of the data stream: Here you can define the cost of the sensor data. We do not restrict you from defining the value, but please keep in mind that without preview and refund options, only a few customers will be ready to pay a fortune for a data stream. On the other hand, setting a very low price might result in a total collected payment under 1/1000 of a cent.
We encourage you to check the current price of 1 MIOTA, which is 1.000.000 (one million) IOTA tokens.
We suggest that you set the price within the range of 1.000 to 50.000 IOTA tokens, depending on the cost and maintenance efforts of the sensor.
- Data Fields: The most essential part of the sensor configuration. Please provide information for every parameter that will be captured by the sensor and stored on the Tangle. You can add or remove fields by pressing the (+) and (x) buttons on the right.
Parameter information consists of three fields:
- Field ID: This ID should be unique among all other parameters for the specific sensor. Please note that the ID must begin with a letter ([a-z]) and may be followed by any number of letters, digits ([0–9]), hyphens (“-”), and underscores (“_”). Max allowed length is set to 40 characters.
- Field Name: Plain text parameter description that indicates the purpose of the field. Max allowed length is set to 40 characters.
- Field Unit: Physical quantities and units abbreviation, primarily in the International System of Units (SI). It can also be a unit of environmental measurements, like humidity, air quality, precipitation, wind speed or direction. Please keep the length of this field within 20 characters.
The following example describes a sensor that detects Star Wars vehicles as they are passing the base and submits vehicle data to the Tangle.
Vehicle data that will be captured: vehicle name, model, manufacturer, and vehicle class. Any other data could be added to the dataset, but for simplicity, we’ll use these four parameters.
After you submit the data, sensor is added to your account. From this point you can access it’s data by clicking on the sensor ID.

Each sensor card contains a link “Download Publish Script” at the very bottom. This link generates a series of files that contains all necessary configurations for a selected sensor and provides you with usage examples and documentation on how to store data in Tangle. I will address the usage of this script in the next blog post.
In the new version of the application, all your own sensors are also automatically added to the list of your purchased sensors, so you don’t need to purchase a data stream of your own sensor. Please note that this is not the case for previously added sensors.
You can also remove a sensor. But please be aware that the wallet seed associated with the sensor is also removed. That means that you can no longer withdraw funds that were transferred to the seed.
That’s it for today!
In the next articles, I will explain how to use an auto-generated script to publish new sensor data to the Tangle and briefly talk about Masked Authenticated Messaging. I will also discuss the use of Google’s Firebase, the cloud backend infrastructure behind the Data Marketplace application.
Part 1: IOTA Data Marketplace — Update
Part 2: Sensor Onboarding (this post)
Part 3: Publishing Sensor Data
Part 4: Cloud Backend Configuration
Follow us on our official channels for the latest updates:
Discord | Twitter | LinkedIn | Instagram | YouTube